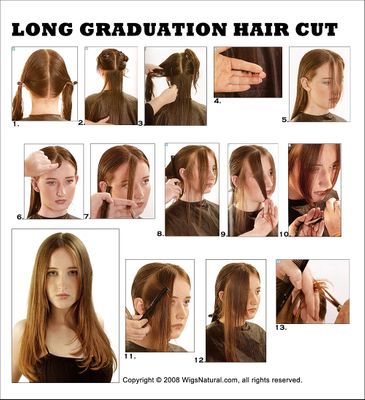
Long Graduation Hair Cut
1. Part the hair down the center from front to nape.
2. Take a sub-section going cross from the center parting to the side and pin the rest of the hair out of the way. Do the same to the other side. Comb the hair down tight into the neck. Cut straight across at the appropriate level and check both sides with your fingers to make sure the length is the same.
3. Take the next sub-section (0.5” width) across the same way. Continue this sub-section technique until you reach the crown.
4. Take a sub-section from about 0.5-1” above the ear, straight across. Take a piece of hair closest to the back of the ear and blend it into same of the hair already cut from back section. Pull it down and cut it to the same length. Follow this on both sides of the head but check both sides are same length after each cut.
5. Re-check the length by combing all the hair back behind the ears and down straight at the back. Now re-part the hair down the center to the crown and comb the hair down to the back and sides as appropriate.
6. Draw an imaginary line from middle of each eyebrow back into the hair, and take a small triangle at the very from of the hair in the center. This hair will be your guideline for the shortest length of hair on the forward guideline.
7. Chip this hair to the length you want.
8. Once cut, take a section from the middle part down to the top of the ear, making the section no wider than 0.5-1”.
9. Imagine a line down the middle of the face and comb the section to that line. Cut on that line using the short guideline cut just done. Do this for the whole section, but the further down the section you get, the further down the imaginary line on the face you should cut.
10. Take the same section on the other side and cut in the same way, ensuring that you always cut to the imaginary center line and that the shortest point is the guide cut, getting longer as you move down the section.
11. On the first side, take another section on the same angle, working back another 1”. Follow the guideline and imaginary centerline in the same way, cutting hair into the center. Follow on the other side.
12. This technique can be worked right back into the center part at the back of the head, or to create some soft layers in the back to blend, or it can be taken just to the top or back of the ear to create only forward graduation on the face.
13. Once completed on both sides, blow-dry straight if possible, as it is easier to check the weight distribution. Once dried, remove any excess weight or uneven length in the graduation by slicing or chipping.
Copyright@2007 New Holland Publisher (UK) Ltd.

